Although I currently work as the lead for a consulting practice Alcester, I am, in the coming weeks due to switch roles to work in the Private Cloud pratice as a Principal Consultant within Computacenter. As with all technologies, I find the most valuable asset to learning is having the ability to tinker with the product and gain deeper understanding. Although this is possible on customers systems to some extent, you’re usualy far too constained to freely play. Also when needing qualifying difficult senarios or replicating a customers complex problem, a test/dev/lab system becomes an invaluable asset.
When I leave Simplify IT I will be walking away from a 16 blade dual Cisco UCS 5108 chassis with a pletora of technologies (VCF, VME, Proxmox, OCP, Hyper-V). Whilst I look to “link the fire” in my new home at Computacenter, I have taken it upon myself to build a home lab.
First off, a big thank you goes out to William Lam who works for Broadcom directly, he has kindly created a fantasic set of resources with deep insight into undocumented or hard to find settings and has gone the extra mile in helping the community create laboratory systems for VCP9. Without his insight, things would of been more tricky!
Build of materials
Below is a BOM which was used to create my VCF9 Lab, I took Williams idea and modified it a little. With the insane prices for DDR5 I did consider purchasing a prior generation DDR4 system, to get more memory capacity at less cost. However the running cost for the system I wanted, plus with the NVMe tiering feature available in VCF9, I have managed to get what I need in one small, super tiny box. Hurah! Here is what the final BOM looks like.
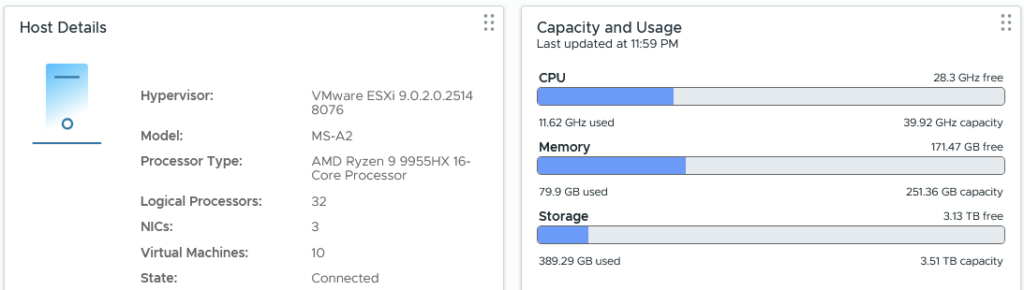
- 1 x Minisforum MS-A2 with AMD Ryzen 9955HX
- 1 x Crucial 128Gb DDR5 SODIMM Kit (2 x 64Gb)
- 1 x Samsung EVO 990 Plus 1TB for NVMe Tiering
- 2 x Samsung 990 EVO NVMe M.2 SSD 2 TB for vSAN and Local Storage
- 1 x Mikrotik CRS310-1G-5S-4S+IN for switching and routing
- 2 x 0.5m 10G SFP+ DAC to connect the MS-A2 to the network at 10Gbps
- 1 x Icy Box Heatsink IB-M2HS to try and keep things cooler
The Minisforum MS-A2 is a small little beast, it’s advertised at only supporting 96Gb but it works fine with 128Gb. Although with pricing going crazy due to AI, I think aquiring the 2 x 64GB DIMMs is tough. I was very lucky and got the last one for a sub £700 price on Amazon Europe. The back of the unit supports 3 x M2 NVMe, two of which are cooled by a fan and the third (where I placed the 1TB Samsung EVO 990 Plus) will support a heatsink, hence the Icy Box IB-M2HS. The unit overall runs fairly quiet, but once fully loaded does “spin up” from time to time. I went with 2 x 2TB for the other slots to give more options for larger workloads.
The Mikrotik CRS310-1G-5S-4S+IN switch runs RouterOS on v7.21.1 which allows L2 VLANs as well as L3 BGP neighbor relationships for the NSX edges in the environment. The switch uplinks back to my Zen interent home router using the 1Gbps BASE-T port. I’ve configured Wireguard on the Mikrotik switch as well, which allows me to VPN into the environment as I roam around, which is handy on those days away from home. If I can ever afford, or have a strong need for more than one ESX host, the switch will support another 2 x 10Gb SFP+, i.e. one more ESX host! There is a CRS309-1G-8S+IN variant that has 8 x SFP+ as well, which would be an option if you want three. I have placed some 1Gb BASE-T tranceivers in the other ports to connect to various other devices in my home network. RouterOS also supports DNS forward and reverse resolution out of the box, which saves a virtual machine and allows VCF to happily build itself.
I did originally order the below items but unfortunately the T705 is not recognised by ESX (thankfully I got a refund), additionally the P510 was faulty on delivery and was corrupting files on write.
- 1 x Crucial P510 1TB M.2 2280
- 2 x Crucial T705 2TB NVMe 2280
ESX did install but every attempt to upload a file, on investigation the SHA256 hash was not right. After nearly a week of pain and slow debugging I replaced the P510 with a Samsung NVMe and the issue went away. With the corruption in place, VCF would build to a point but would then fail with random errors, it was a horrible experience but am very very glad that I found the root cause and resolved it.
Build Process Summary
As part of writing this blog, I have uploaded the configuration files for VCF and Mikrotik to a basic Github repo as they are easier to access and maintain. Below is a high level quick summary of the steps to get everything up and going is. Later in this article I will unpack the process for each of these steps.
- Configure the Mikrotik router inclusive of:
- DNS records for forward and reverse resolution
- NTP client and server.
- VLANs.
- IP addressing for VLANs.
- BGP configuration.
- BFD configuration.
- Wireguard Configuration.
- Boot the MS-A2 off a USB key with a kickstart file. Confirm the configuration for NVMe tiering to get a boost in memory from the default 128Gb of system RAM.
- Deploy SDDC Manager onto the ESX host.
- Configure SDDC Manager customisations over SSH to allow vSAN ESA using the NVMe drives and to permit a single host deployment.
- Connect to the VCF online depot using a token avialable on the Broadcom support portal. I chose not to use an offline depot as it adds more memory requirements to what is already pretty constrained with a single box.
- Download the latest binaries for VCF 9.0.2 (at time of writing).
- Depoy VCF9 by uploading a JSON file into the deployment wizard.
- Connect to vSphere and configure “centralised connectivity” for NSX, this includes a two node NSX edge cluster with private transit gateway IP block and VPC external IP blocks.
- Confirm BGP neighbors come up and full adjecency is formed.
- Deploy a test VPC and Subnet into NSX through vSphere.
- Deploy a test VM into the NSX subnet, confirm the Mikrotik routing table has learnt about the subnet and that the test VM can reach the internet.
Configuring the Mikrotik Router
The simple way to first configure the Mikrotik router is to download the WinBox utility which will search the network and find the device, in order to find it simply connect the standard copper ethernet port to your existing home network. Once you can browse the configuration file in my Github repo and apply the bits you need for your environment.
I chose to setup a unique network behind the Mikrotik with only VLAN 1 (PVID / untagged) bridging back to my existing home network, this created a more contained test environment. The ether1 port on the Mikrotik is considered the external WAN internface and is set to DHCP for easy of use. The changes I made to my Zen home router were:
- Set DNS to the WAN address of the Mikrotik (set by DHCP reservation on my home router), so by default I also pickup the VCF resolution. The DNS server forwards off to 1.1.1.1 and 9.9.9.9 for unknown zones.
- Create a UDP port forward for Wireguard so I can VPN in.
- Add a static route to my internal network behind the Mikrotik router.
- Set the Mikrotik ether1 port with a DHCP reservation so its easy to find and so the static route created works over time.
The main Mikrotik is seperated into the following VLANs, I wanted the environment to reflect a “customer” environment, hence seperating out the VTEP networks for host/edge and also for host/VM management. This certainly isn’t required, but also doesn’t make things that much more complicated.
| VLAN ID | Description | MTU |
| 100 | Host Managment | 1500 |
| 101 | VM Management | 1500 |
| 102 | VMotion | 9000 |
| 103 | vSAN | 9000 |
| 104 | NSX Host Transport | 9000 |
| 105 | NSX Edge Transport | 9000 |
| 106 | NSX Edge Uplink A | 1500 |
| 107 | NSX Edge Uplink B | 1500 |
SDDC Manager Customisations
Three additional tweaks were made to the SDDC manager, which allow for a single host deployment and for the non-certified NVMe drives to be claimed for vSAN ESA. The second line is for VCF 9.0.1 and 9.0.2, the third is for 9.0.0. I put both regardless.
echo "vsan.esa.sddc.managed.disk.claim=true" >> /etc/vmware/vcf/domainmanager/application-prod.properties
echo "feature.vcf.vgl-29121.single.host.domain=true" >> /home/vcf/feature.properties
echo "feature.vcf.internal.single.host.domain=true" >> /home/vcf/feature.properties
echo 'y' | /opt/vmware/vcf/operationsmanager/scripts/cli/sddcmanager_restart_services.sh
NVMe Tiering
Tiering was configured within the ESX kick start but in order to understand the steps, you need to run the following commands. The first one will show you the NVMe devices, fortunately in my setup the 1TB NVMe is a different model, so is obvious, if you have multiple of the same, it can be more tricky to work out what is what. The main thing is the NVMe must have no partitions, so the one used for installing ESX will certainly have some, and you can easily spot that with the ls command below, partedUtil is another option.
esxcli storage core device list
ls -lah /vmfs/devices/disks/
esxcli system settings kernel set -s MemoryTiering -v TRUE
esxcli system settings advanced set -o /Mem/TierNvmePct -i 100
esxcli system tierdevice create -d /vmfs/devices/disks/t10.NVMe____Samsung_SSD_990_EVO_Plus_1TB____________EEF2A35159382500
reboot
Following the reboot, all of a sudden we have more “RAM” to play with. The memory is low here as I recently rebooted and have only booted vCenter and NSX.

BGP Validation
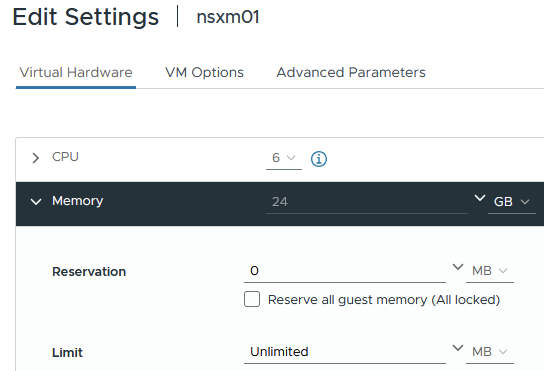
The rest of the build is fairly self explainatory by following the Broadcom documentation and reviewing the uploaded files. Within my Gitrepo I have also put the VCF planning workbook which shows the low level details of everything that was configured. Once thing I certainly did do was remove the memory reservation from the NSX manager appliance, this was eating well into the limited resources.
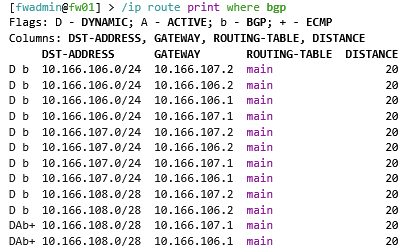
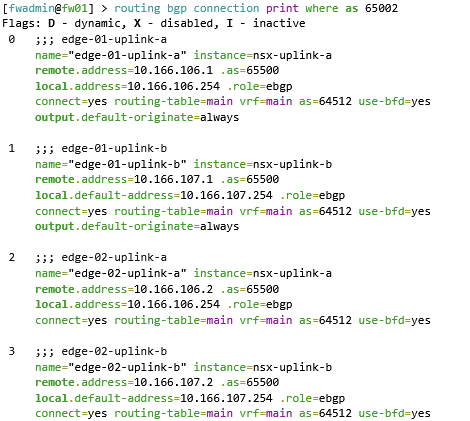
In order to validate BGP the following commands can be run on the Mikrotik. The first command shows the BGP routes which have been advertised from the NSX edge cluster nodes. The second command shows what Mikrotik call “connections” but in usual BGP language is the BGP neighbor summary command.
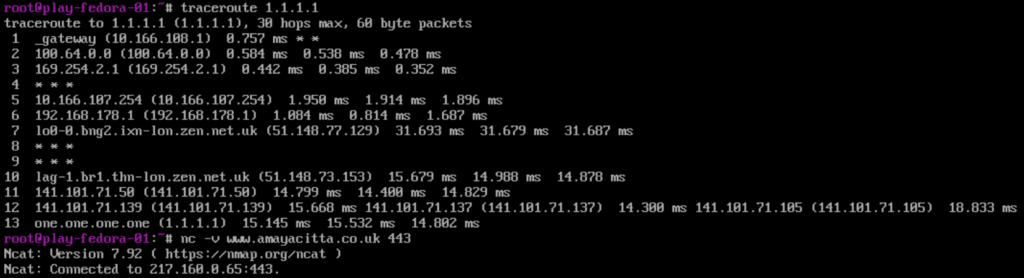
Once BGP was confirmed all good, I could happily reach the internet fom the VPC subnet on the test virtual machine. Hurah! Remembering to try stateful TCP as well as ICMP, just in-case asymetric routing was at play!
What’s Next?
I plan to deploy Tanzu using VPC subnets, I have lots of exposure to VKS in the field, but have not yet played with VCF9 VPC integration. Although I currently still prefer a good old manual deployment of NSX, it appears Broadcom’s direction is torwards the use of VPC’s – so it had best be learnt and understood fully.